English

Why a Pre-Installation Checklist Matters
A successful installation of the OUF-W Series Ultrasonic Flowmeter begins with meticulous preparation. Skipping critical steps like component verification or site assessment can lead to inaccurate readings, signal interference, or even equipment damage. This guide walks you through the essential pre-installation tasks to ensure optimal performance and longevity of your OUF-W system.
Step 1: Unboxing and Component Verification
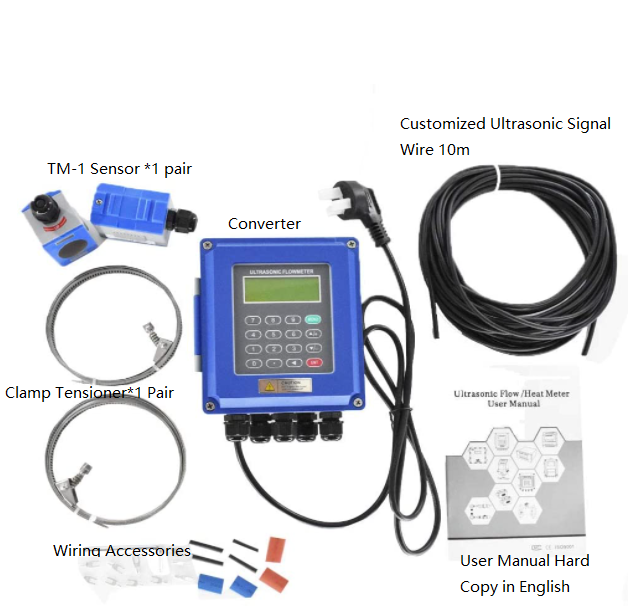
Upon receiving your OUF-W flowmeter, carefully inspect the package to ensure all components are present and undamaged:
• Wall-Mount Converter: Check the model number and ensure the LCD display and keypad function properly.
• Transducers: Verify the type (clamp-on, insertion, or inline) and match their unique codes.
• Accessories: Confirm the presence of signal cables, PT100 temperature sensors (if ordered), mounting brackets, and sealing kits.
Step 2: Essential Tools for Installation
Gather the following tools to streamline the installation process:
1. Ultrasonic Thickness Gauge: Measure pipe wall thickness (critical for Menu M12 input).
2. Pipe Polishing Machine: Remove rust, paint, or scaling from installation points to ensure optimal transducer contact.
3. Couplant: Use high-viscosity, temperature-resistant gel (included in the kit) to enhance ultrasonic signal transmission.
4. Steel Belts/Clamps: Secure clamp-on transducers firmly to the pipe.
5. Multimeter: Test electrical connections and grounding.
Step 3: Site Preparation and Safety Measures
1. Pipe Conditions:
o Ensure the pipe is fully filled with liquid and free of air bubbles.
o Avoid installation near pumps, valves, or bends (maintain 10D upstream and 50D downstream from disturbances).
2. EMI Mitigation:
o Keep the flowmeter and cables at least 3 meters away from frequency converters or high-voltage equipment.
o Use shielded cables and ground the converter’s shielding terminal to reduce electromagnetic interference.
3. Environmental Factors:
o Ensure ambient temperature stays within -30°C to 60°C for the converter.
o Protect the installation site from direct sunlight or water immersion (use an instrument well for underground pipes).
Safety First:
• Wear protective gear (gloves, goggles) when polishing pipes or handling chemicals.
• De-energize the system before wiring to prevent electrical hazards.
Step 4: Pre-Installation Parameter Setup
Before mounting the transducers, input these parameters into the OUF-W converter:
1. Pipe Dimensions:
o Outer diameter (Menu M11), wall thickness (M12), and material (M14).
2. Fluid Properties:
o Liquid type (M20: water, oil, etc.) and viscosity (M22).
3. Transducer Configuration:
o Select transducer type (M23) and mounting method (M24: V/Z-method).
Pro Tip:
Use the M91 (Transmission Time Ratio) post-installation to validate parameter accuracy. A ratio of 97–103% confirms correct setup.
Common Pitfalls to Avoid
• Ignoring Pipe Scaling: Thick scaling reduces signal strength. Clean pipes thoroughly or use insertion transducers for heavily scaled systems.
• Loose Grounding: Poor grounding exacerbates EMI. Test ground resistance (<1Ω) with a multimeter.
• Overlooking Flow Profile: Turbulent flow near pumps skews readings. Install flow conditioners if necessary.
Talk to our engineers to ensure no step is missed! For complex installations, book a virtual consultation with our engineers to review your site plan.
Next in the Series
In Article 3: OUF-W Converter Installation & Wiring, we’ll cover wall-mounting techniques, explosion-proof setups, and step-by-step wiring diagrams for seamless integration.

Please contact us for free quotation by form below. We promise the quickest response within 24 hours: